Image : http://www.flickr.com
What is a receiver?
A receiver is so much great thing that you can connect the speakers and other components (like a DVD player, CD player, TV, Xbox, PlayStation, iPod, etc.) is the "brain" of the fair truth. The idea of linking all components of a receiver is the concept of audio / video switching, allowing you to switch to different video sources (such as TV, DVD, camcorder) on your TV
and change> Audio source accordingly - all without touching anything but the receiver.
Of course, the main purpose of audio / video switching with an audio receiver is to drive the surround speakers or stereo external speakers.
Most receivers have a lot of inputs, can have up to eight speakers and a subwoofer (usually, 5.1 or five speakers and a subwoofer), several video inputs, even HDMI. You can connect yourXbox, TV and DVD player into the receiver and use a remote to switch between different video sources (games, TV, DVD video) and pumping surround speakers. Let's start with the inputs and outputs. If you do not understand something, read all the procedures, since most of them will be explained in detail.
Note that a receiver is the center of your home in the theater, so this really, to guide you through the basicsconnecting your home theater complete.
So what the hell is all this "on the back of your receiver?
I'm going on almost everything you can find at the back of your receiver. The one I'm basing this guide off a Harman Kardon AVR-247 I'll start from the top left of the unit and Working my way to the right, then I'll start at the left of the next row and so on.
The top three entries are for antennas. An FM antenna cableslide in the storming of the standard two first son of speakers are connected to the remaining slots AM. Of course, you do not have to connect the antennas, but if you want to receive AM / FM radio through your speakers, you'll want to go ahead and do it. These connections are standard, so if you lose one of its branches, go buy another for a few dollars.
You've probably heard of composite video. This is a basic video connection commonly used by most any component (TV, DVD, VCR, in particular).Their common and cheap. In this capacity, very low.
Composite uses an RCA cable for video (yellow) and two RCA audio cables (red and white, stereo). The problem is that a composite video cable combines luminance and chrominance in the same cable, which reduces the quality of the image. You lose a lot of sharpness and color begins to deteriorate from the original source. Its useful when you need additional input or the device is connected onlycomposite video. Otherwise, use something else, component video, such as. Sounds very similar and different.
S-Video is the next in line after composite. It uses a different type of connector (five pins in a circle) and gives a little better video quality. It is also one video cable, then you must connect audio separately. In this case, is likely to use a pair of red and white RCA cables for audio inputs.
Next step: aton of composite audio inputs. These inputs use left channel and right channel RCA cables, usually red and white. They resemble those of the yellow composite video cable, and even could be used for video and the yellow for audio, but we will continue the color scheme of how it is;) composite audio is the bottom of the barrel Audio .'s perfectly fine for most use, but you are a surround sound quality high, you do not want composite.game systems like Wii or Xbox, and very basic DVD players are a perfect match for composite audio applications.
The same goes for VCRs, CD players, and everything that has only a composite audio output. In addition, if you do not have surround sound, or its receptor is only two channels (2.1, stereo), you will not be able to use anything but composite audio. Note that the audio input is a compound in each composite video input for ease oftheir match. Plug-and erroneous entries does not ring when you are in this particular video input.
This is one of the least used features of a modern receiver: 6 (or 8) channel direct input. Only used for two purposes: SACD or DVD audio. SACD is an acronym for Super Audio CD. It is a proprietary audio format developed by Sony for special CD recorded in 5.1 surround sound. This means that you need a CD or a DVD / CDSACD player that supports a receiver with SACD support (as in photo), and of course, Super Audio CD. DVD Audio is the same idea, different brand, different media (DVD, not CD!).
DVD-Audio are special DVDs that are recorded in 5.1 surround sound and can be played by devices with support for them. These CDs go all the way up 7.1 surround sound, which means that you should have two front, two rear, two side speakers and a subwooferenjoy 7.1 surround sound. Most receivers support up to 7.1 now, but you will not find DVDs with that kind of capability for movies. 5.1 surround is still the de facto standard, do not run out and buy more speakers in the short term.
You can skip this next little item because it is exclusive to the brand of receiver (Harman Kardon). The bridge is a link connecting the property to the point
iPod. You need to buy a separate component that includes adocking station and special cables to connect the iPod. Fully integrated with the receiver, showing
menus and songs from the face of the LCD of the receiver. This lets you easily through your songs to pump the speakers, whether stereo or surround.
Of course, the music on your iPod is stereo sound, the best thing that can happen is simulated surround sound or stereo surround sound, the same music playing in the two front channels
through rear and center channels. Some receivers do this more intelligent than others, but more on that later.
Here, we have our tickets for the high-end audio outputs. Essentially the same performance wise, has fiber optic connections (with the square) and digital coaxial (like an RCA cable).
Both are 100% digital, while the composite is analog. The only way to get true surround sound from any source is to use one of these connections (or SACD / DVD> Audio Option)
Almost all DVD players these days have a coaxial or optical digital (sometimes both). Many cable and satellite in high definition will also be those
connections so that you can enjoy surround sound in 5.1 channel high definition. The choice between the two, there really is no difference between audio quality, so feel free to use
what you like (or what you are forced to).
I do not think I need a picture for more details. His power of someentries. The first is to power the receiver and the other for what you want. So when you turn
in the receiver, you give power to another device (DVD player, CD player, cable box, whatever). I do not necessarily recommend it unless it specifically suits
needs. It is useful if you're short on outlets, of course.
More than ever, we will use: D-Bus RC-5 input / outputs. It is used for infrared remote controls to take care of your houseTheater System. Honestly, this is not something any of us will use. Some addicts real high quality could be to use something for her, but I've never gone through a device that uses this technology. Stick to the remote that came with your camera, or buy a quality universal remote. It is not necessary for this option. Another possible use of what may be more common if the beneficiary of the front panel of the phone is locked (such as inside a closet), you could get an infrared transmitter to lockin front of her. This transmitter is connected to another device somewhere in your room that accepts signals from your remote. The receiving device then transmits the remote commands to your receiver (via the transmitter was attached to the front during the regular infrared transmitter).
Pre-outs, located on the remote input and output. Pre-outs are used when you want to add an amplifier to your system to increase the power (and hence volume / audioquality). Average
users do not use it for anything other than the subwoofer pre-out. You want to run a cable from your subwoofer subwoofer subwoofer to the front to provide out-
frequencies on the right. It's the right way to connect the subwoofer to your surround sound system. The other entries will not be used unless you intend to add
amplifier. It is very necessary for domestic use. You can add an amplifier if you try to fill a room the size of a small house with enoughsound, but you're not, right?
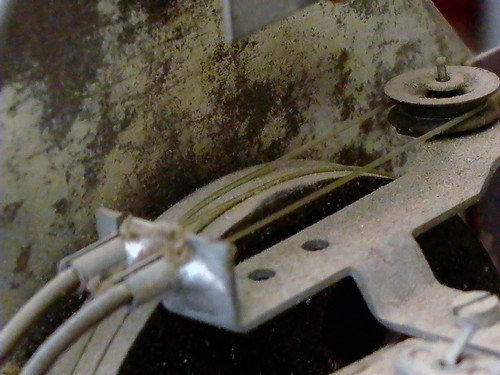
Here, we finally arrive at the meat of the system: inputs speakers! Harman Kardon use bind posts for connecting speakers, as shown in the picture. The
work because they lose their turn counterclockwise, then sneak into the speaker wire under the covers and tighten the bracket by turning clockwise. This will
give your speaker wire make an adjustment of Nice will probably not be loose on itself over time. Other trademarks may be usedOther types of connectors, but bind the entries are very common.
You may have been able to say that it is a receiving channel 7.1 because the speaker inputs.
You have space for two front left and right, two rear speakers left and right
a central channel and two on the left and right "," the channels that are placed somewhere between the front and back (side surround, or 7.1). If you have enough
speakers, you can go ahead and plug the other side of twosome, but can not play any sound at all on a DVD 5.1. You have a DVD that supports 7.1
around, and now there is simply no market for it. CD stereo surround sound taste explosion with seven speakers, but also for some of the larger rooms, which is a
advantage.
Our last set of connectors for this receiver: component video. The best video you can get next to composite or S-video. "Ll notice that a set of three cables (for allvideo)
Envoy Red, Green and Blue. I do not think that is what the cable, however - which separates the video signal luminance and two color channels separately. In the past, the component
does in fact represent R, G, B (a division of primary colors in transmit and recombining the target device), but is not used in current component video
connections. Component video can carry high definition signals, all the way up to 1080p, it ismost cost effective and easily available in high definition input.
Not seen in this receiver is DVI and HDMI, two digital video connections, everything.
HDMI is the newest, fastest, highest video and audio connection now available. It is the only cable that can carry audio and video into one - not to mention, in high definition.
HDMI must be supported by the source and display that you connect to use all its functions. Notall DVD players, decoders, receivers or support
HDMI audio and video.'s increasingly standard now to support both. The advantage is obvious: less cable clutter, the superior audio and video. You can get up
HD video and 7.1 surround sound 1080p via an HDMI cable. The new cable and satellite, DVD players, DVD players, HD receivers and more expensive
full supportHDMI capacity. Your best you can go completely digital.
The last link in this article is DVI. DVI is all digital, like HDMI, but can not process audio signals. HDMI can provide technical superiority
but I do not think any difference. DVI supports high definition video up to 1080p and HDMI. Its being used less frequently,
but if you bought a new computer or video card in your PCrecently, is likely to have a DVI connector (or two) on the same port. Most computer monitors use DVI now and video cards
have followed suit. HDMI is edging its way into the PC market, but its dominance is seen in the field of home cinema.
Now that you are familiar with the common connections we'll connect everything together.
This part of the recipient and will guide you through the connection of a 5.1 surround system (five speakers and a subwoofer) with an HDTV, adefinition cable or satellite great DVD player and 5.1 receivers.
Your TV and components
When you place your TV depends on how big it is, what is the size of your room and sit. If its 50 inches, do not sit more than 10-15 meters, but not least, whatever.
A 60 "set is perfect for 12-20 feet. If you have a 32 inch, try to sit more than 8.12 meters. Your receiver, DVD player, cable box and other elements mustof course, be together, but not physically placed above the other. They are all hot, especially your receiver. If you have no other choice, drag a piece of wood between the components using heat to pass.
Presidents
The first step is to define the configuration. Different rooms call for different locations for the speakers and subwoofer. If the room is typically a rectangle, go ahead and place your two front left and rightsomewhere in flush with the TV on this side of the room. Your left speaker goes to the left corner, right speaker in the upper right corner. Do not bother with speaker wire yet (unless the speakers with speaker wire already attached, in this case, please let that hang for the moment). Note that the speaker is left or right depends only on how to connect to your receiver. The speakers are not really called "left" or "right."
Depending on how you acquiredspeakers, front speakers could be larger than the rear speakers. That's how you know they are for the front. Otherwise, all speakers have the same shape and size, and can use each for any purpose.
An exception is the central channel. Usually, a center channel is much shorter and wider than the other speakers. It should be used for the center channel. Sometimes, the speaker 5 can be the same, often on a very cheap. You can use one of thesespeakers for any purpose.
Your center channel should always go on top or below the television. However, you have to do is ask! It is not called the center channel at all, you know. Any movie pump almost 90% of voice you hear and most of the rest of the sounds in the central channel. It is essential to your surround sound setup.
Your subwoofer should always be in the ground. If you can not puton the floor, do it as close as possible to the ground. Placement behind the objections or in closets will diminish its effects. In a perfect setup, the subwoofer would be on the floor near the TV (can be left or right) on your line of vision. Nothing must block the side of the subwoofer that air will come out (usually covered by a grill protecting the subwoofer itself.)
When it comes to finding a good place for your speakers, you can ride a horse. Youusually buy compatible speaker stands online or in store. You can also
use existing shelving, shelving store, or place them on tables or other objects. No matter how you do, try to keep as close to the speakers at ear level as possible. A loudspeaker mounted on the ceiling of your room does not give the optimal listening experience.
The last thing to consider is the design of speaker cables. You probably need at least 100 feet of speaker cable, but you will often findeven using a lot more if
try to thread running through the roof, under the carpet, through the basement, or around objects to conceal it. Take measurements and buy at least 10% more than the wire
you think you need. You probably use it!
Wiring
You must know the different types of speaker cables available before the introduction of home theater. If you purchased a home theater (home theater in a box), it is probable that comes with 100 feet of speaker wire terribly cheap. YouI do not want that! Treat yourself: buy high quality cable speaker 14 gauge. Anything above 14 gauge is just to lose weight and be sensitive to interent, loss of quality, and poor quality over long distances. Fourteen years is an indicator of good thickness and suitable for most home theaters. Also make sure its not too thick - the speaker wire simply will not catch the speaker wire on some receivers.
Some receivers use the entries speaker owner. Sony isexample. Many Sony receivers are equipped with special connectors for speaker cables and will not accept standard cable. You will need to use the cable supplied with Sony President, take the advice of loudspeaker cables and Sony put it on your own or buy some of these special connectors from Sony directly to place your speaker cable. My recommendation? Avoid any receivers with standard speaker wire posts, no caps / / connectors. Search for messages to link or other outlets that allow you to slide inand place in a typical speaker wire.
Once you have resolved your speaker wire, you have to do some cutting and stripping, if you chose to buy their own. This is the easiest way it looks, do not worry!
Measure the length of each at a time, cut the speaker wire with scissors or very large or very sharp knife. Now that you have to strip the wire ends. Use a removal tool or just plain old scissors. You can place the scissors on the cable and gently applya little pressure while turning the scissors on the cable, cut the plastic liner. Finally, you weak enough that only you can drag by pulling with the fingers. You need at least 1 / 4 "from son exposed.
Now you can connect the speakers. Note on speaker cables from the difference between the two extremes. You must use a phone as a positive and a negative as you. Sometimes, the layer of color is different between the two or no text in onenot the other. Keep track of this - the side that is used for the loudspeaker positive, good for use on your receiver. Crossing the two can cause damage, either immediately or in the future. It might work this way, but you do not!
Connecting the speakers is fairly easy. Front left to front left of your receiver center channel speaker, the center of the receiver, etc. .. The rear speakers can be called "Surround" or "Surround Back"instead of just "back", but keep in mind, if you have a receiver of 8.1 or 7.1 channel "surround" may indicate side surround speakers, no rear speakers.
Subwoofers
Your subwoofer will be a bit more complicated. There are different ways to do and many variations of inputs / outputs on the back of the subwoofer. I'll go with the method more standardized and effective first.
You'll need a cable to connect the subwoofer under. If you do nothave one or do not want to buy one, you can substitute a standard RCA cable red or white (or a couple, since they tend to be connected, simply let the cord hang elsewhere). It will work, but it is not really the best way to do it. You'll also need an adapter which is called Y. In the back of your sub, there should be a left / right input (red and white). You plug the Y adapter for these connections, then the cable subwoofer (or RCA cable) to the other end of the Y (note: if you do not have Yadapter, simply select the left or right of entry to connect to).
Now take the other end of the cable and connect it to your receiver from the
Previous subwoofer output. I hope you have an active subwoofer that is, the file is connected to an AC outlet. Everything you need to do now is that the plug and the subwoofer is good.
If you do not have RCA connectors on the subwoofer or if only the cable connectors loudspeaker (and probably not the power), you must connect to the old. Itsfront left and right speakers can be connected to the output connectors of the subwoofer signal to turn on your receiver. Then will run over the left and right inputs on the subwoofer left and right speaker outputs of your receiver . In this way, the subwoofer is powered by the receiver and does not work and an active subwoofer. We also have a power outside of the front speakers with this method. A good idea is to buy a new box, powered to the line RCAshots.
Connect the Dots
You have the makings of hard road. Now we have to connect your TV, DVD and cable / satellite. Always try to use the best options first. If your DVD
HDMI and your receiver has, to use it. If your DVD only has composite, S-Video and component video cable component use. When it comes to audio, it is absolutely necessary
use digital coaxial (jacks are usually orange) or fiber optic (usually theJack is hidden in the drive and it has a door when the door is open, a red light is visible). If you're not one of those two, you will not get true surround sound! When all else fails, use composite (red and white) audio connectors.
Note: Look closely at the connections on the receiver. Everything is labeled as the first series of red, green and blue component video inputs can be labeled as "Comp 1". If you use composite audiocablesfor their sound, you need to connect to the coordination made with "Comp 1". This may not be clear looking at the receiver, so refer to your receiver from the user to know which video inputs, use the audio inputs. Very often, you'll be able to configure the receiver inside the menu with command remotely.
In some receivers, all the component video inputs, for example, are related to onecomposite audio input (usually "DVD") so if you connect more than one input component, which will be competing for sound when more than one device is active. That's why you want to configure the component inputs to use different audio inputs.
The manual is the only way to find a way to do it. Composite video usually in compounds audio inputs with naming conventions like Video 1 -> Video 1, Video2 -> Video 2, etc., but the DVI cable and can not, as a component. You can also configure digital audio inputs to meet the video inputs, you intend to use. For example, if you use a coaxial digital input (perhaps "Digital 1"), and uses component video, you'll want to match "Digital 1" with "Comp 1". Again, consult your manual for how to do that.
See Also - Best Receiver Onkyo TX-8555
Minamoto. Waza. Tamashi. Three distinct phases in the design process Pioneer AV amplifiers and receivers are intended to reproduce sound that is as true to original as possible. Each amplifier and the receiver is a masterpiece. Some of the worlds most respected recording engineers and sound tune carefully the soundstage to ensure that what you hear in your living room is perfect, the original sound.
See Also - Onkyo TX-8255 Receiver VSX-517-K
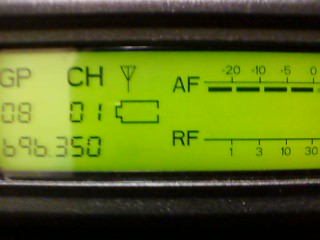
Image : http://www.flickr.com
The brain of a surround sound system is the receiver that offers a surround sound system, amplifiers and the ability to change. The receiver is an important component of a surround sound system, because there are many devices that connect to it, and all types of audio equipment like speakers, VCR, CD player, TV, DVD, light disco and much more.
The beneficiaries also tend to lose the key elements of audio are no longer being usedby people who are "old" now that monitors the tape and phono. I would say that Sony is one of the most popular brands here and other quality brands, Kenwood, Panasonic, Pioneer, JVC, Onkyo, Yamaha, Denon and RCA. I do not know if they noticed that all models are different decoder. Most people are more impressed by those recipients with a perfect combination and system that eliminates most all comments and all the noise going onthrough your surround sound system.
Here are some tips on how to find the receiver to your home entertainment system. If you buy today almost every receiver must have DTS (Digital True Surround) and should be able to manage a surround sound system, what it means is that the sound from your surround sound system will be its closest you the option mono.
With multichannel outputs you have the chance to broaden their soundvarious stakeholders in you entertainment in the room and set their volumes each at a different level. In doing so, you get what you called DTS (Digital Surround sea) you can literally hear every sound coming from all stakeholders, angles and directions.
As for mono only one indicator can be extended to all the different channels consistently. Before you buy a receiver to search the first to know if the receiveryou want to buy is compatible with your surround sound system, what it means is that you should check if your DSTV, TV, CD, DVD and MP3 player can be plugged into the receiver and should provide a sound, which otherwise you have a problem.
By making your receiver has acquired the main brain of your surround sound system which can manage between all the different audio / video that does not helpdistance for all components of a single and simply press a button to select them.
There is a wide variety of receivers to buy online, you should look for one that you like and do what you want it to do. If you purchased one of the recipients of the best brands should be able to use his new receiver for all of its various components in your house and send signals from anywhere in your house without interruption.
These receptors are large, they canthe use of several components simultaneously so that you can be watching a DVD and your kids can watch cartoons on TV in the house and can not play a song in one of the other parts does not great. Just one last tip before you buy the receiver, be sure to ask about the recipients of the only guaranteed to be saved from something that happens because the receiver.
Friends Link - Pioneer VSX-1019AH-K Receiver Onkyo TX-SR607 Receiver Sony STR-DH800 Receiver

Image : http://www.flickr.com
The main thing I want to accomplish in a home cinema to create a place where you feel as if you watch a movie in a movie theater. There are different ways to accomplish this, depending largely on how much money to spend on it, and what factors are most important to you. A good home theater, however, must have a surround sound speaker system powered by an audio - video of multiple receptor and a variety of high quality audiosources, among other things.
All audio components are routed through your audio / video, which normally serves as the control center. Surround sound decoding of information and routes audio to the speakers. Your AV receiver should have enough inputs and outputs to control all the equipment you will use, as well as optional inputs in case you want to add a device to come as a satellite radio module or an iPod.
One of the most important elements of your home theater system is the speakers. It makes sense to listen to speakers before buying them. left speakers should have a neutral tonal balance (ie, do not exaggerate or suppress any particular sound frequencies, but that faithfully reproduce the sound originally planned), and a wide range of sounds (ie do not lose any information extreme frequencies, but instead of all or nearly all, of the> Audio spectrum). They must have clarity, transparency, and detail of sounds (such as providing small delicate details, but their sound has a natural advantage, hard), but must be dynamic (ie, the moments should be handled, but also and to the subtleties of the audio) and should provide credible dimensional sound three musicians who performed in specific places. Your subwoofer should produce a bass sound that is clear, powerful and extended deeplyand should also blend perfectly with the rest of your speaker system. You want to choose speakers that can handle the electricity produced by you receive A / V and uses, or at least in the mix, in your living room.
There are several options on how to introduce speakers. If the speakers on the wall, the wall or free? Considerations include asking how it is important that stakeholders be discreet (if it is perceived in the wall "speaking) or complement the appearance of the flat screen (if the judge speakers on the wall), and the concessions they have to do to adapt to separate speakers in your room and do outweigh the benefits of its speaker independent.
How do I configure speakers. There are several types of surround sound systems to choose from. There are Dolby Surround 4.0 with front left, front right, center and mono surround channel. It is Dolby Digital 5.1Sent the basic format now, with front left and right, center, left and right surround and low frequency effects. Dolby Digital EX 6.1, but can be reproduced with 5.1, 6.1, 7.1 or speaker systems. Three systems 6.1 surround speakers, it is just behind the lounge, it is not practical if the seats are against the back wall. For 7.1 speaker systems, has two surround speakers behind new domain of expression and in general soundsbetter.
There are many options and considerations when considering how to create a home theater that feels like watching a movie in a real theater. How to choose, install and configure the speakers is one of the most important aspects of your home theater system.
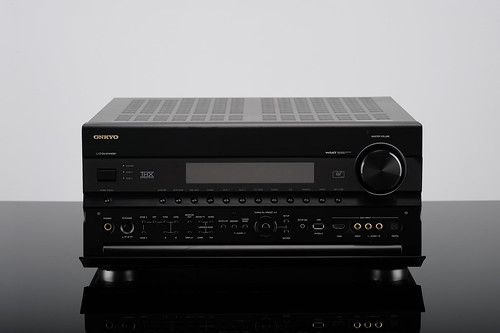
Image : http://www.flickr.com
KVM (keyboard, video and mouse) via CAT5 extenders can be used to delete sensitive computers or from difficult environments, or restrict physical access to your computer. products such as extending VGA, DVI, S-Video or HDTV CAT5 supplements are used to expand the video screens. Each extension consists of two units - local and remote units that are interconnected by CAT5 cable / 5e / 6.
cables with low cost and ease of installation of these twisted pairsthat, CAT5, CAT5e or CAT6 cable, they have become a popular choice over traditional coaxial cables for transmitting signals AV and KVM. However, using a type of twisted pair cable that is not appropriate for your installation environment can lead to keyboard or mouse erratic performance, data loss and degradation of image quality, compromising the purpose of your job or length of the video.
One cause of the video signal and loss of quality when you use a twisted paircabling infrastructure installation environment is one of extreme levels of electromagnetic interference (EMI or RFI also called or RFI).
Electromagnetic Interference
Electromagnetic interference is an undesirable disturbance in an electrical circuit by electromagnetic radiation emitted by an external source.
All electronic and electrical produce electromagnetic radiation during operation. The current flowing in a circuit generates amagnetic field. The potential difference or voltage required for current flow produces an electric field. The strong magnetic and electric fields can cause an electrical device to affect another. Where this is not intentional, is known as the electromagnetic interference, often shortened to EMI.
The electromagnetic interference may disrupt normal operation of electronic equipment. Normal levels of EMI such as those generated by computers, switches or routers without effect on NTIKVM and video extenders. However, the extreme levels of EMI in the environment can interfere with the signal. This can lead to distortion and loss of the video image. More cable and care less attention to the installation of cable, plus the effects of EMI.
Some common sources extreme EMI in a building air-conditioning, engine lift, generators, radio transmitters and welders. Installing the cables near high power transformers orvery close (less than one foot) of fluorescent lighting can also cause EMI problems.
What are the effects of video signals EMI
EMI affects both audio and video. In audio signals, the hidden details of environmental information at the bottom. In video signals, interference distorts the signal and obvious ways.
The sources of noise such as air conditioners, elevator motors, generators etc. lines manifests itself as noise orpoints. This is caused by electric and magnetic fields generated in the engine running. More powerful engine plus electric and magnetic fields. rapid rotation of the engine and out can also cause interference.
A torn and distorted picture is caused by running the cables near sources of strong magnetic field, high power transformers and fluorescent lights. The cables must be very close (less than 1 foot) fluorescent lampsinterference occur.
A visible trend lines of interference is the result of interference from such sources as radio transmitters. The radio signal must be robust and close to interfering with the video signal is transmitted over a twisted pair cable.
EMI protection video signals
A simple and cost effective to prevent EMI to interfere with the transmission of signals is to use a shielded cable to transmit the signal. Cable shielding is providedin a wide range of designs. Each type of shielded cable construction provides several advantages that should be considered carefully when selecting the best and most cost effective option for a given application.
Braid Shields: Shield stranded in a twisted pair cable provides an effective protection in audio and RF ranges. It also provides excellent structural integrity, while maintaining good flexibility. Braid shields are better than aluminum to minimize lowfrequency interference and less DC resistance.
Blade Shields: A shield twisted pair provides excellent protection against electromagnetic interference and radio frequency audio. Weigh and cheaper than braid shields.
Because of their smaller size, coats of aluminum are commonly used to protect individual pairs of multi-pair cables to reduce interference. the son of drain are typically used with protective film to facilitate the completion of the hullconnection at the connector.
Combining Foil / Braid Shields: A pair of twisted cables with a combination blade / braid shield provides maximum efficiency across the spectrum. The role of the association / braid combines the benefits of a coverage of 100 percent aluminum with the strength and low DC resistance of a braid.
How shielding reduces EMI problems
Thinking and absorption are the main means dramatically reducing the EMI shield effectpush the signal conductors in a shielded twisted pair cable. The Shield will also absorb some energy from the radio transmitter EMI, which reduces the amount of EMI that makes internal conductor twisted pair. When properly installed with shielded connectors ground equipment, protection redirects a small amount of energy electromagnetically. These effects of reflection, absorption, and redirection shield very effective in reducing problemshigh frequency interference.
The best way to protect against EMI low frequency magnetic fields as a large motor or transformer, is to provide enough distance between the cable and the source field interference. Cable shielding has limited effectiveness in preventing interference problems low frequency magnetic fields. Instead of a magnetic field to reduce the reflection or absorption, the wire produces a magnetic field in oppositionthe lowest frequency of the interference of the magnetic field. This has the effect of reducing the intensity of the magnetic field variable reaches conductors twisted pair.
Statement
If you have a problem of electromagnetic noise, you should use a shielded cable. In the case of an electromagnetic frequency noise only, from a radio station, a piece of shielded cable provides adequate protection. To ensure effective protection against low frequencieselectromagnetic fields, such as an electric motor, a braid or a combination of aluminum / braid is necessary. If you're not sure what kind of electromagnetic noise, we recommend a combination of aluminum / braided shielded cable, as it offers the best protection against a wide range of electromagnetic noise.
Visit - Sony STR-DH100 TX-SR507 Pioneer VSX-01TXH
Yamaha 1065 and 2065, home theater receivers you discuss in this brief video Crutchfield.
Tags - TX-SR307 Sony STR-DH800
More details about the SLS Q-Line Gold 5.1 home theater system, please visit our Web site at: The Q-express.com www.av Gold Line Home Theater Surround Sound System features 4 satellite speakers and center speaker shelf, all using SLS International PRD100 Planar Ribbon Drivers conducted in the United States and woven Kevlar midrange. To meet the demanding needs of low frequencies, SLS has included a visit Subwoofer provides precise, controlledlow. A multi-channel Dolby Digital / DTS surround sound receiver powers the system of 110 watts per channel with an algorithm incorporated into the balance room, component video output with the expansion of the video screen and a universal remote. For configuration-stop shop for every lease we have included an omnidirectional microphone. This microphone can easily calibrate your speaker setup for optimal sound. For a full and rich experience will leaveon the edge of your seat for this home theater system is the choice. The advanced technology of tape driver has a clear sound and the way it was meant to be heard. A complete system includes home theater speaker center channel, 4 satellite speakers, subwoofer and AM / FM. The ribbon driver technology provides a clean and precise with low distortion and multiple surround sound decoders built in. down its Order today for Free Shipping with FedEx Ground. While supplies last! When this system is...
Related - Pioneer SC-05

Image : http://www.flickr.com
I am writing this guide after asking a couple of times on how to connect a laptop to a TV. People want to do this for several reasons. First, it is ideal for presentations at work, at school or at home. It is also suitable for viewing images and videos with friends, watching movies on DVD, and now also used to view Blu-ray and HD on an HDTV.
First, we want to ensure you get the most out of your laptop when it is displayed on theTV.
If you have an HDTV with HDMI inputs, make sure your laptop has an HDMI output. If you do, you're in luck! Your HDTV can display from your laptop on high-definition resolutions. All we need is an HDMI cable to connect them. If your HDTV HDMI inputs are already sold out. An HDMI switch is the best solution for you. supply switches that can connect up to 5 HDMI sources to one HDMI input.
If you do not have HDMI output on the laptop, check if you have a DVI output. Some of ASUS, andDell laptops have. If you do, you can connect your notebook to an HDTV via an HDMI to DVI. Both are digital cables to produce what will be the same HD as a standard HDMI cable.
If your laptop does not have HDMI or DVI out, should have a VGA output. VGA connection is capable of high resolutions. However, the different types of TV support VGA resolutions. You should check the maximum resolution of your TV model is compatible with VGA.
Almost all laptops come withan S-Video. It will not be as big of a picture, but certainly do the job with an S-Video.
After connecting the cable selected, start your laptop and see if your TV has been detected. If not, you should go to the properties of your screen and find the setting that will allow your TV to display on your laptop. Where to find the configuration can vary depending on the graphics card (just look around). If you experience difficulties in obtainingyour TV to display an image, make sure you have updated drivers for your computer screen. Now, you'll probably want the sound of something other than the portable speakers. Thus, you can choose to exit the TV, or an explosion of home theater audio receiver.
The best way to connect audio to your TV or receiver via a cable digital audio. Both coaxial or Toslink digital audio cable work perfect for crispHigh audio quality. Make sure your laptop via the coaxial cable is digital or optical audio output. Some laptops use the headphone jack to double as a digital coaxial (S / PDIF). If you use this method, you will need a 3.5mm to RCA adapter with a digital coaxial cable. If your laptop does not have these outlets and still want the high sound quality. Do not worry! You can always get an external (USB) sound card that has a coaxial or optical digital output. Irecommend the Creative Sound Blaster X-Fi Surround 5.1 SB1090 Toslink optical audio output.
Another way, which does not require any add-ons, is to use headphones (3.5 mm) takes his laptop to the RCA (red and white) on your TV or receiver. To do this, you Simply Adapter 3.5mm to 2 RCA audio cables with two RCA.
I know that all these cables can be confusing for you. If you have problems that each cable is similar or moreon a wire, check the cable guide CableTrain.com. All these cables are available on our website as well. I hope that now you can connect your laptop to the television success of the best way possible!
Thanks To - Pioneer VSX-819H-K Receiver Onkyo TX-SR606 AV Receiver
Image : http://www.flickr.com
What is HD radio and how it compares with satellite radio?
You've probably noticed a growing number of advertisements that are promoting this new thing you've never heard before: HD Radio. They say that the game "contents unknown" and the digital audio quality. You've probably heard the best part of all the publicity, "no subscription fee!
Let me help you learn a bit of HD Radio. I'll try to keep things simple so that gives allinformation you need as little jargon as possible.
HD is not HD
Firstly, is likely to have heard of HDTV and have not heard, I suppose you live in a cave. HD Radio is not the same as HDTV. HDTV stands for high definition. Do not confuse this even in HD HD Radio, because in this context means Hybrid Digital.
However, the radio transmission offers better than standard radio signals. Some radio HDstations transmit signals in 5.1 surround sound digital audio, allowing you to enjoy a true concert experience. You can be sure that more stations opt for this mode of transmission in the future.
Digital channels and sub-
HD Radio allows many stations to transmit digital information through the FM or AM frequencies. In addition, these digital communications may be sent to many sub-channels, allowing about three stations by frequency. Thistripling the number of stations that could listen to HD radio. What is on the screen, you ask?
In general, the standard AM / FM radios will display the following: 104.7 FM
HD radio, are as follows: 104.7 104.7 FM HD-1 HD-2 (one with HD-X indicates a sub-channel)
Since 2007, the signal quality is reported to be near CD quality audio on the FM band, which is a huge leap in the radio sector. However, it is highly unlikely thatAM frequencies to experience this improvement, which operates on the AM band much lower. Think of it as a pipe. A smaller pipe garden could not provide the quantity of water hose and fire department, unfortunately, MO is smaller than the garden hose.
Advances in digital technology
There were reports and allegations contained in the initial stages of HD Radio (2006) of static and interference when setting the HD channels. However, technology has advanced significantly inthe last two years and has improved signal quality and isolation. Do not worry about loss of quality if the strings here.
You may also have heard that the FCC (Federal Communications Commission) has begun the process of making radio broadcasts and analog TV obsolete. What does this mean for you? Well, you can be sure that the improvements will not be realized. Unfortunately, this means that most of the standard AM / FM radios would become obsolete after a fewyears may be forced to buy a new HD Radio to your car or at home.
Comparison with satellite radio
Price
Satellite requires a monthly subscription ($ 10 - $ 15 / month), activation fee and a cancellation fee if you cancel before your contract is over (if you subscribe to the "reduction of signing the contract.") To receive the satellite radio signal (either Sirius or XM), you need a special antenna and a satellite radio or a satellite has been builtsatellite tuner or a tuner simply not ready (tuner is always required and sold separately). Expect to spend between $ 150 - $ 300 in equipment alone, according to what you need (additional tuner or antenna, etc.) *
HD Radio is free. Just spend the money on the receiver itself. Instar of satellite radio, you might get an HD tuner in the receiver on the shelf, or you could get separately (if you already haveHead of Unit HD Ready). They are much more affordable in any case, it costs between $ 100 - $ 200 *. Total
* Please note that these are generalizations of the minimum and do not include additional features as you can with your radio (eg Bluetooth, USB, 3.5 mm auxiliary input, navigation, etc..) They do not mind parts and labor, each vehicle varies.
The quality and coverage
The advantage of satellite radio is a cover. Youcould lead Los Angeles to New York listening to the station exactly the same throughout the length of the trip. Satellite Radio also tend to specialize in their season of high definition stations. For example, there are specific channels for comedy or sports. Satellite radio is commercial free, because after all they pay for it.
HD Radio is locally focused. You tune in metropolitan and local stations would not have satellite coverage as shown above.While the HD channels are much like any traditional radio stations are not qualified, they may be able to do something similar to satellite radio in the future.
Both HD and satellite radio to broadcast the digital quality audio. At this point, you do not have a significant advantage over others because, as with radio transmission and reception rate is sensitive to interference and static. Do not be fooled by the word "satellite" because of this fact.
If youtry to keep up with current technology, but also want to save money, then go to HD radio is not so bad. Most of the better known brands out there like JVC, Eclipse, Kenwood HD Radio Ready produce dash receivers, which makes it necessary to obtain additional accessories. Only a handful of companies like JVC Double (new) Marketing is HD Radio tuner.
If you are strict with the selection available, and not too concerned about the costs associated with satelliteRadio, then maybe you should opt for Sirius or XM radio. Many popular brands such as Sony, Alpine and Pioneer sell both sat ready and built in tuner satellite receivers, so it should not be a problem in their research.
The choice is yours, of course. One thing is certain, however. Digital technology is changing rapidly and becoming the standard for video and audio entertainment. Analog (or non-digital) technology will be obsolete. Youmust upgrade to digital technology over time. Find out what you like and test them both. Sometimes the best on the market can not be the best for you. Good luck in your digital revolution!
Thanks To - Pioneer Elite VSX-01TXH Receiver Sherwood RX-4105 Stereo
Www.buy.com QSWLOCR Link: A wireless camera and receiver combination that allows you to monitor an area through television. You can also connect the receiver to a VCR or digital recorder to record video files. The receiver can support up to four wireless cameras and lets you view one at a time manually or in an automatic sequence. You can receive signals from the camera at a distance of up to 300 feet line of sight, and an audio receiver so you can listen and see whatpassword. The device is small, but strong enough to send a signal up to 300 feet line of sight, and has a microphone for sending audio and video to the receiver. This camera can be placed inside or outside, because it is resistant to weathering. It has a target of 6 mm, so that you can get a picture of good size, even at several meters from the camera, and 12 LEDs that provide night vision up to 20 feet.
Recommend - Sony STR-DH700 AV Receiver
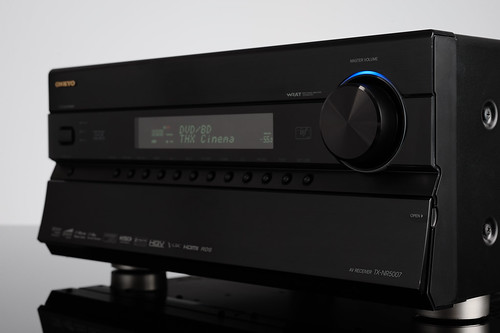
Image : http://www.flickr.com
Get the best of your home theater. HDTV brings Dolby Digital (TM) 5.1 surround sound. 5.1 Space five speakers and a subwoofer for surround sound with.
Two front speakers and two rear speakers are placed at the center of the action. A fifth, center speaker placed above or below your TV. The subwoofer can be placed anywhere in the room, and delivers the serious effects of low frequency to complete the cinema experience loud.
Surround soundsystem comes with a receiver "box" that controls the sound of all stakeholders.
To maximize your HDTV choose the audio cables right to connect surround sound on your HDTV. Connections are important.
Some cabling options to configure your HD TV Surround are;
- HDMI cable - The simplest and best way to connect your HDTV with surround sound, HDMI cables carry, clear audio and crisp videosingle cable.
- Optical cable - Transferred in a fiber optic cable, the audio is sent using pulses of light and supports multiple channels of stereo audio transmission. Compatible with the AC-3, Dolby Digital and Stereo.
- Digital coaxial cable - Transferred in a single shielded cable, the audio signal is sent into electrical signals, and supports multi-channel stereo audio stream. Compatible with the AC-3, Dolby Digital and Stereo.
- RCA -An analog output channels to transmit mono or stereo audio
Get more out of your HDTV with audio configuration that puts you at the center of the action.
Related - Onkyo HT-RC160 AV Receiver Onkyo TX-SR876 AV Receiver
Www.cbradiomagazine.com tried three different microphones in two different situations - both fixed and at highway speeds with the window open. Radio reception in the first part of the video is a radio project HR2600 modified with a different glass mixtures for use as a BC band receiver (although he often shows acutally 29.3650 27.3650). The tests were done in the Gaza Strip any CB Radio Amateur in the second part is an LT grant. Stock 4-pin Uniden Microphone DM-452 Power / Echo canceling microphone Styka SR-65SBCancellation of test results of microphone: Microphone The stock has been very clear on standing, but it was very noisy at highway speed. Was audio and radio was less swing compared to DM-452 or Stryker 65. The DM-452 had more audio and figures above the top of the radio, but also collected a large amount of road noise. The Stryker has been almost as strong as the microphone to try to win over the microphone. The 65 best numbers really turned Stryker ProductionThe DM-452.
Friends Link - Sony STR-DH100 AV Receiver Sony STR-DH500 VSX-01TXH
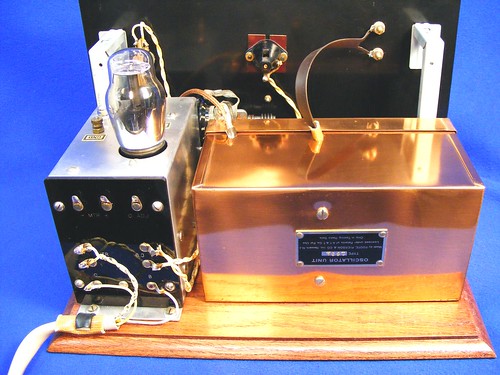
Image : http://www.flickr.com
So had a good sound in your car and you want to make the same music in your living room. This is possible.
home audio subwoofers are now available for purchase. By investing in one, the same rules on car audio subwoofers applicable.
In a home theater system, the subwoofer is the largest of speakers. This is usually hidden in the back of the room, but the unit that operates the most serious tones.
When viewing a movieshows the noise of thunder or the roar of an earthquake, you would think that actually happens in your home.
If you have one, it's like you brought the film to their relatives. You can be really immersed in the DVD that you pop in.
Those who wish to buy are in a good lookout for subwoofers looking to add to your home theater system with sound. Home audio subwoofers, though hidden, still designed for aesthetic purposes.
Somethingspeakers that appeal to audiophiles and cinephiles. It may not be as portable as subwoofers car so if you buy one, make sure that this is the one actually used in your home. This must be something you can benefit from a period of time.
The first thing to do is configure it so that you look good in your living room. The cable must not be impeded. You can do this by making high-quality wire and put it near thespeakers.
You should also check if the amplifier goes well with subwoofers and speakers. As subwoofers car subwoofers home audio must be compatible with two speakers and an amplifier.
You can be class-home audio subwoofers on the market today, but if these do not work well with the speakers and amplifier, then, would make sense.
Configuration is easy, you can even do it yourself. Simplycable to connect the line level preamp subwoofer output on the AV receiver. Then you can connect to the subwoofer.
Enabling this function to adjust the volume of its ideal level. You can also manipulate the settings so that the home audio subwoofers give you the sound you had the intention of listening.
Friends Link - Onkyo TX-SR876 AV Receiver
2 15 inch Polk MOMO Subwoofers not even week old =] with 6 1/2 Alpine Type S's, Diamond Audio Amplifier, and Alpine CDA-9884 Receiver(Head Unit)
Visit - STR-DH800 VSX-519V-K
Here is my vintage Ameco AC-1 Ham Radio novice CW transmitter on 40 Meters at about 5 watts output, along with my homebrew receiver and station controller (keyer and TR switch). If you are not familiar with this vintage novice rig, google search and you will find some interesting information on it. The AC-1's signal is being monitored in the shack for this video with a Kenwood R-1000 receiver - my homebrew receiver has only headphone audio output right now. As you can hear, my AC-1 produces a clean and stable signal. Hope you enjoy the video!! 73, Jack WA6KYO RECEIVER INFO: I've been getting questions about my homebrew receiver. It is a simple solid state direct conversion type with two separate audio filters for added selectivity. It's basic, but actually works quite well on 40 meters. The metal box above the chassis and just behind the National Vernier dial is the VFO and is extremely stable. I will make a video demonstrating the receiver soon. For more info on the AC-1, including partial replica kits, decals, coil forms, etc... there is an AC-1 Yahoo Group: groups.yahoo.com Here's another great AC-1 page: www.qsl.net Looking for more info on homebrewing your own replica? Original instruction manual, schematics and parts list information can be found here: www.qsl.net
My Links - Onkyo HT-RC180 Receiver Onkyo TX-SR607 Receiver Pioneer VSX-01TXH Receiver

Image : http://www.flickr.com
A lot of "interference" problems that afflict communities using cellular, PCS, microwave, satellite or other systems have their origins in events that originated outside the premises of the communicator, but the proximity to disseminate or other high power RF installations. An increasing number of communication services is also crowded places with high ambient electromagnetic RF generated by a high concentration of lower power radio transmitters. It wasexpected that about 100,000 new transmission and reception will be needed in coming years to meet demand for new wireless services. The pressure on the availability of the site is forcing the implementation of many services, and the problems of EMI are ubiquitous. Unless stated and properly treated, these problems can seriously hinder the deployment of wireless systems and expensive operation.
Despite EMI may occur dramatically, as the accidentsystems together, his touch is generally more subtle. Victims often suffer from significant degradation of the system before realizing that it is a problem that concerns us. This often occurs during the operation, repair or repair events. Typical signs of interference EMI are:
* Character unusual equipment defective test.
* Problems intermittent power regulator.
* Temporary, unwanted audio, video or digital noise signals superimposed.
* The high rate of unexplained signalsinterruptions.
* Poor or coverage of certain sites unreliable.
* General "malaise" in a particular site.
Many wireless media have always been built in a well-placed, with high-power FM and TV antennas. It is not uncommon for FM signals over 100,000 W or television signals to exceed five million W.
In such situations, there is a real threat that high levels of RF signal will brute force interference problems in wirelessprovide or support the team. The potential for overloading the receiver desensitization, the receipt and harmonic intermodulation interference is important. There are even cases where ambient levels of field strength limits at the approach of radiation risk for staff, including shelters and buildings.
close to AM broadcast stations with effective radiated power up to 250,000 sites W can be subjected to intense electric and magnetic fields, which are coupledteam through the coaxial cables, telephone lines, and grounding and power cables. fundamental and harmonic frequencies of AM stations and modulation of the audio components of overlap case of common data, T-carrier and the spectrum clock. The potential disruption of the system is enormous. Torres commonly associated with mobile sites effectively "concentrate" the signal of AM broadcasting to local values and above the forecasts in space.
Even in places that are not close to broadcasting, areoften miscalculated so there is a significant intervention of the EMI. Although wireless is not generally considered "great power", the concentration of chains on a site can not compete with the power of television. For example, 32 channels maximum power PCS FCC may extend about 50,000 W. A group of eight channels of research can accumulate more than 25,000 W. An installation of wireless cable with 32 channels can contribute more than 200,000 watts in the 2 GHz band.
At these power densities, not only the RFengineer is interested in attitudes EMI, as intermodulation and desensitization, but also the enforcement staff and the direct input signal RF equipment. Perhaps recognizing this potential RF bathroom, the FCC requires that all PCS transmission facility to be inspected and certified free of RF compliance.
Intentional interference EMI RF transmitters is not the whole problem. The mass conversion of the radio equipment room for digital architectures has led toan environment rich in step signals radiated site. As digital signals tend to be square waves with a rich harmonic spectrum, and convergence of clock frequencies in the VHF range, wireless carriers are increasingly finding that they are producing energy right combs EMI through its own and their neighbors are receiving benefits. This problem is compounded as the antennas down. Even the digital equipment that complies with FCC Class "A" specifications can interact with receptorsseveral hundred meters, if not properly protected.
EMI containment management and challenges of the resolution is not as simple as it seems. Action must begin with a clear institutional policy for carrying out the procedures for electromagnetic compatibility in the process of developing the site (often a critical factor is missing). Just as the loss of revenue of a scrambling system of balls is a concern of businesses and should also be a system of dynamic programming free of interference.
Athe more frustrating is trying to define, let alone maintain, a steady state RF situation everywhere. In fact, the electromagnetic environment on the site is better controlled in constant evolution. Most mobile sources are by nature "explosions" and unpredictable in their operating cycle. Even the stations to change the modes and observing irregular hours they operate.
new transmitters, channels and modes of operation can be calculated emission or near the siteand incompatible with existing systems. Identification of new operators is further complicated by the policies of the FCC license on the market and, consequently, there can be no trace of all the exact positions of the transmitter.
Space does not permit a thorough discussion of techniques for solving such problems known as intermodulation and desensitization. However, there are some basic approaches that can help contain or resolve equipment worth less input EMIchallenges
Site analysis *. acquisition of business management, site and design of all systems engineers must consider EMI refers to in his post. Clearly, the ideal scenario would be to select all sites at a sufficient distance external EMI and keep them sterile. In reality, however, system developers must choose sites with respect to the "clean" EMI environment and establish an appropriate legal basis and control of site structureelectromagnetic environment, including the ability to eliminate the sources of worry if the sign consolidation efforts fail.
In general, many potential troublemakers can be identified early in the process of site selection of adequate protection can be designed efficiently in the new system. A careful study of problems, including field measurements where necessary, must be made to identify and document risks, and anticipate the future. (The diagnostic measures mayfor the preparation of the existing zone.) These studies should use proven electromagnetic parametric models and spatial data such as consulting firms specializing in this field.
* Protection against RF. It is not uncommon for a high-level RF site must be occupied, despite the best efforts of the site evaluation, which requires that the site team is surrounded by a virtual "box", designed to block more signals outside the RF input as possible from sensitive circuits.However, a perfectly insulated container is neither practical nor cost effective. There should always be the penetration of the shield box to account for the transmission lines of the antenna, the main power connection, telephone lines, doors, ground wires, air conditioners and water pipes and sewer. The trick is to restrict the passage of the RF by these ideas, too.
Most of the needs of the wireless industry can be met by the shield of innovative applications of the architecture of protection of advanced materials. Fibermitigation compounds, suspensions and coating more traditional techniques can produce an attenuation of 40 dB or more in existing buildings. Even if no "military secret" rules, such mitigation will often be sufficient to prevent the ingress of unwanted RF electromagnetic destructive, and potential hazards of radiation to the site personnel of the team.
In addition to creating the case with any test, other techniques are needed to adequately meetpenetrations, such as the use of filters for power lines and transmission lines and blocking RF signals from the offender's door, air conditioning and other openings. complete identification of the best way to meet this challenge must be exercised for each site. Importantly, the implementation of a comprehensive technical analysis since the beginning of the project will measure and determine the extent of potential problems caused by RF and identify alternatives to ensure effective controlcompatibility of systems and the environment.
Based on these data and other support, shielding and other protective RF may be selected to complement and influence the architectural planning and construction. In some cases it may be necessary to modify the standard electronic designs to ensure that existing facilities and future expansion of the site will remain resistant to RF interference.
Site operators should recognize that the shield "systems" anti-RF input on your computer,and this system is an integral part of the real activity of the site air conditioning or power systems. They must recognize that its system of protection must be cautious. Too often, out of sight, the attitude of mind on the shield components allows future violation of the effectiveness of the protection system.
* Measures of the evidence. test measurements should be incorporated into the overall design process to include baseline measures on suspicion of "threat" of frequencyprotective equipment and new facilities are in place. These data, move a baseline to support future maintenance of prevention, which must be done on a regular basis, and solving problems. Whatever the installation of equipment and site selection process is planned and executed, and not the invariable "unauthorized entry" Wall of cable TV, air conditioning or replacement of any other change that would EMI shield damage or other preventive procedures.
Wheninteference deal with EMI, it is a pay me now or pay later, my world, and the latter option is almost always more expensive. It is never too early to plan for the effective reduction of RF interference. The actions of the first analysis of the RF environment, shielding and other RF interference prevention should be taken into account the principle of site selection, building design or material selection and updating process . It is important to realize that the reduction is a prerequisite for a life-cycle wirelesssite, careful attention to the demanding requirements of the evolving site that can degrade RF EMI or modify the system performance.
A consultant is qualified and experienced engineering EMI compatibility must be maintained in the design and planning process and maintained throughout the operational phase. An analysis of the electromagnetic environment of a potential site wireless avoid costly surprises in the final product, and ensure compatibility between the site andoperator environments.
Friends Link - Onkyo HT-RC160 Onkyo HT-RC160 Receiver Sony STR-DH700 AV Receiver
Anlässlich unserer EP wiring Cubeaudio die bei Göttingen, MIT und Markus Gumball aufnehmen Co., haben einen kleinen Podcast wiring yesterday, oder auch eine Dokumentation aufnehmen von den Aufnahmen von Gitarren-und Tobias Sander, die ihre Gitarren waren 3 Tage. Viel Spaß!
Thanks To - Pioneer VSX-918V AV Receiver TX-8255 Sony STR-DH700

Image : http://www.flickr.com
What is a Receiver?
A receiver is that big, heavy thing that you plug your speakers and other components into (like a DVD player, TV, CD player, Xbox, PlayStation, iPod, and etc.). Its the "brain" of the show, really. The idea of connecting all your components to a receiver is the concept of audio/video switching, allowing you to switch to different video sources (like TV, DVD, camcorder) on your TV
and thus changing the audio source accordingly - all without touching anything but the receiver.
Of course, the main purpose behind audio/video switching with a receiver is to drive audio to external speakers, like surround sound or stereo speakers.
Most receivers have a plethora of inputs; up to 8 speakers and a subwoofer (more commonly, 5.1, or five speakers and a subwoofer), several video inputs, and even HDMI inputs. You could plug your Xbox, Plasma, and DVD player into the receiver and use one remote to switch between all the different video sources (games, TV, DVD video) and have your speakers pump out surround-sound. Let's start with inputs and outputs. If you don't understand something, read through the entire How-To as most of it will be explained in detail.
Keep in mind that a receiver is the hub of your entire home theatre, so this How-To will actually guide you through the basics of connecting your complete home theater.
So what the heck is all this 'stuff' on the back of your receiver?
I'm going to go over just about anything that you would find on the back of your receiver. The one I'm basing this guide off of is a Harman Kardon AVR-247 I'm going to start from the top left of the unit and work my way to the right, then I'll start at the left of the next row and so on.
The first three inputs are for antennas. An FM antenna cable would slide on to the first jack while two speaker wires would plug into the remaining slots for AM. Of course, you don't have to plug your antennas in, but if you'd like AM/FM reception through your speakers, you'll want to go ahead and do that. These are standard connections, so if you lose one of your antennas, just go buy another for a few bucks.
You've probably heard of composite video. Its a very basic video connection used by most any component (TV, DVD, VCR especially). Its common and its cheap. As such, its very low quality.
Composite uses an RCA cable for video (yellow) and two more RCA cables for audio (red and white, stereo). The problem is that a composite video cable combines luminance and chrominance in the same cable, reducing the quality of the picture. You lose a lot of sharpness, and the color begins to degrade from the original source. Its useful when you need the extra input or the device you're connecting only has composite video. Otherwise, use something else, like component video. Sounds similar; very different.
S-Video is next in line after composite. It uses a different type of connector (five pins in a circle) and gives you marginally better video quality. It is also a video-only cable, so you'll need to plug in audio separately. In this case, you'll probably use a pair of red and white RCA cables for your audio inputs.
Next up: a ton of composite audio inputs. These inputs use left channel and right channel RCA cables, typically red and white. They look just like the yellow composite video cable, and you could even use them for video and the yellow for audio, but let's keep the color scheme how it is ;) Composite audio is the bottom-of-the-barrel in audio. Its perfectly fine for most use, but if you're looking for high quality surround sound, you don't want composite. Game systems, like the Wii or Xbox, and very basic DVD players are a perfect match for composite audio.
The same goes to VCRs, CD players, and anything that only has a composite audio output. Plus, if you don't have surround sound, or your receiver is only two channels (2.1, stereo sound), you won't be able to use anything but composite audio. Note that there is a composite audio input under each composite video input so that it is easy to match them up. Plug them in the wrong inputs and you won't get sound when you're on that particular video input.
Here we have one of the least-used features of a modern receiver: 6 (or 8) channel direct input. This is only used for two purposes: SACD or DVD Audio. SACD is an acronym for Super Audio CD. It is a proprietary audio format developed by Sony for special CDs that are recorded in 5.1 surround sound. That means you need a CD or DVD/CD player that supports SACDs, a receiver with SACD support (as in the picture), and of course Super Audio CD's. DVD Audio is the same idea, different brand, different media (its a DVD, not a CD!).
DVD Audio discs are special DVDs that are recorded in 5.1 surround sound and can only be played by devices with support for them. These CDs go all the way up to 7.1 surround sound, meaning you would need to have two front, two rear, two side speakers and a subwoofer to enjoy full 7.1 surround sound. Most receivers support up to 7.1 now but you won't find DVDs with that kind of capability for movies. 5.1 surround is still the defacto standard, so don't run out and buy more speakers any time soon.
You could skip this next little item because it is unique to this brand of receiver (Harman Kardon). The Bridge" is a proprietary connection they developed for you to connect
an iPod. You need to buy a separate component that includes a docking station and special cables to connect the iPod. It fully integrates with the receiver, displaying
menus and songs on the front LCD screen of the receiver. This allows you to easily pump your tunes through your speakers, whether it be stereo sound or full surround sound.
Of course, the music on your iPod is stereo sound, so the best you can get is simulated surround sound or stereo surround; the same music playing in the front two channels
is put through the rear and center channels. Some receivers do this more intelligently than others, but more on that later.
Here we have our high-end sound inputs/outputs. Basically the same performance wise, you have fiber optic connections (with the square shape) and digital coaxial (just like an RCA cable).
Both of these are 100% digital, whereas composite is analog. The only way you can get true surround sound from any source is by using one of these connections (or the SACD/DVD Audio option)
Almost all DVD players these days have either optical or digital coaxial outputs (sometimes, both). Many high definition cable and satellite boxes also come with these
connections so you can enjoy 5.1 surround sound on high definition channels. Choosing between the two, there's really no different in audio quality, so feel free to use
what you'd like (or what you're forced to).
I don't think I need an image for the next plug. Its a pair of power inputs. One is for powering the receiver, the other for whatever you'd like. This way, when you turn
on the receiver, you give power to the other device (be it a DVD player, CD player, cable box, whatever). I don't necessarily recommend this unless it specifically suits
your needs. It is useful if you're running low on outlets, of course.
Something else you'll never use: D-bus RC-5 input/output. This is used for infrared remote controls to take over your home theater system. Honestly, its not something any of us will ever use. Some of the real high-end junkies might be using something for it, but I've never even come across a device that uses this technology. Stick to the remote that came with your unit, or buy a quality universal remote control. There's no need for this option. An alternate use for this may be a bit more common: if your receiver's front panel is blocked (like inside a cabinet), you could get an infrared transmitter to latch on to the front of it. This transmitter would hook up to another device somewhere in your room that will accept signals from your remote control. The receiving device then transmits the remote's commands to your receiver (via the transmitter you've attached to the front over the regular infrared transmitter).
Pre-outs , located right under the Remote in/out. Pre-outs are used when you'd like to add an amplifier to your system to boost the power (and hence volume/audio quality). Average
users will not use this for anything but the subwoofer preout. You'll want to run a subwoofer cable from your subwoofer to the subwoofer pre-out to provide it with
the right frequencies. This is the proper way to connect your subwoofer to your surround sound system. The other inputs won't be used unless you plan on adding
an amplifier. This is highly unnecessary for home use. You might add an amp if you're trying to fill a room the size of a small house with enough sound, but you're not, right?
Here we finally get to the meat of the system: the speaker inputs! Harman Kardon receivers use bind posts for connecting speakers, as seen in the picture. They
work by being loosened up as your turn them counter-clockwise, then you sneak the speaker wire in underneath the caps and tighten them back up by turning clockwise. This'll
give your speaker wire a nice tug fit that probably won't loosen up on itself over time. Other brands may use other types of connectors, but bind posts are very common.
You might have been able to tell this is a 7.1 channel receiver because of the speaker inputs.
You've got room for 2 front left and right speakers, 2 rear left and right speakers,
a center channel, and two left and right "surround" channels which are placed somewhere in between your front and rear speakers ("side surround", or 7.1). If you have enough
speakers, you can go ahead and plug in those extra 2 side ones, but they won't play any sound at all on a 5.1 DVD. You would need a DVD that supports 7.1
surround sound, and at this time, there just isn't a market for it. CDs will gladly blast stereo surround through all 7 speakers, though, so for some larger rooms, that's an
advantage.
Our final set of connectors for this receiver: component video . The best video you can get next to composite or s-video. You'll notice its a set of three cables (all for video),
usually Red, Green and Blue. Don't think that's what the cable does, though - it separates the video signal by luminance and two separate color channels. In the past, component
did it in fact represent R, G, B (splitting the primary colors in transmit and recombining them at the destination device), but that is not used in current component video
connections. Component video can carry high definition signals, all the way up to 1080p, so it is the most cost effective and readily available high definition input.
Not seen on this receiver are DVI and HDMI, the two all-digital video connections.
HDMI is the newest, fastest, sharpest video and audio connection available today. Its the only cable that can carry audio and video in one - not to mention, in high definition.
HDMI must be supported by the source and the display you're connecting it to to use all of its features. Not all DVD players, cable boxes, or receivers support both
audio and video in HDMI. Its becoming more and more of a standard now to support both. The advantage is clear: less cable clutter, higher quality audio and video. You can get up
to 1080p high definition video and 7.1 surround sound through an HDMI cable. Newer cable and satellite boxes, DVD players, high definition DVD players, and more expensive receivers
support the full capability of HDMI. Its the best you can get as all-digital goes.
The last connection for this article is DVI. DVI is also all digital like HDMI, but it cannot process audio signals. HDMI may provide a technically superior image,
but I don't think anyone could tell the difference. DVI supports high definition video all the way up to 1080p, just like HDMI. Its being used less frequently now,
but if you've bought a new computer or video card for your PC recently, it probably has a DVI (or two) port on it. Most computer monitors use DVI now and video cards
have followed suit. HDMI is edging its way into the PC market, but its dominance is seen in the home theater arena.
Now that you've familiarized yourself with common connections, let's plug it all together.
This part of the receiver How-To is going to guide you through hooking a 5.1 surround sound system(5 speakers and a subwoofer) with a high-definition TV, a high-definition cable or satellite box, a DVD player, and a 5.1 receiver.
Your TV & Components
Where you put your TV is dependent on how large it is, how large your room is, and where you will be sitting. If its 50 inches, don't sit more than 10-15 feet away; but no less, either.
A 60" set is perfect for 12-20 feet. If you have a 32 inch set, try to sit no farther than 8-12 feet away. Your receiver, DVD player, cable box, and other components should obviously be close together, but don't place them physically on top of each other. They all get hot, especially your receiver. If you have no other choice, slide a thin piece of plywood between the components to help dispense the heat.
Lay Out of Speakers
The first step is to lay out your setup. Different rooms call for different locations for your speakers and subwoofer. If your room is a typical rectangle, go ahead and place your two front left and right speakers somewhere flush with the television on that side of the room. Your left speaker goes toward the left corner, right speaker toward the right corner. Don't bother with speaker wire yet (unless your speakers come with speaker wire attached already; in that case, just let them dangle for now). Note that which speaker is left or right is solely dependent on how you connect them to your receiver. Your speakers aren't actually designated "left" or "right".
Depending on how you acquired your speakers, your front speakers could be larger than your rear speakers. That's how you know they're for the front. Otherwise, all your speakers are the same shape and size, and you can use each for any purpose.
One exception: the center channel. Usually, a center channel is much shorter and wider than your other speakers. It should only be used for the center channel. Sometimes, all 5 of your speakers could be the same, usually on a very inexpensive setup. You can use any of these speakers for any purpose.
Your center channel should always go either directly on top or under your television set. However you have to do this, get it done! It's not called the center channel for nothing, you know. Any movie will pump out almost 90% of the voices you hear and a majority of the rest of the sounds through the center channel. It is a vitally important component to your surround sound setup.
Your subwoofer should always be on the floor. If it is impossible to place it on the floor, get it as close to the floor as possible. Placing it behind objections or in closets will diminish its effects. In a perfect setup, the subwoofer would be on the floor close to the TV (perhaps off to the left or right) in your line of sight. Nothing should block the side of the subwoofer that air will come out of (usually covered by a grill protecting the subwoofer speaker itself).
When it comes to finding a good spot for your speakers, you might want to mount them. You can usually buy compatible speaker mounts online or in stores. You can also
use existing shelving, buy some shelving, or place them on tables or other objects. No matter how you do it, try to keep the speakers as close to ear level as possible. A speaker mounted at the ceiling of your room isn't going to give you the optimal aural experience.
The last thing to keep in mind about layout is speaker wire. You'll probably need at least 100ft of speaker wire, but you'll often find yourself using much more if you
try running wire through your ceiling, under carpeting, up through the basement, or around objects to conceal it. Take measurements and buy at least 10% more wire than
you think you need. You'll probably use it!
Cabling
You need to know the different kind of speaker wire available to you before setting up your home theatre. If you bought an HTIB (home theater in a box), it probably came with 100ft of horribly cheap speaker wire. You don't want that! Do yourself a favor: buy some high-quality, 14-guage speaker wire. Anything higher than 14-guage is just to thin and will be susceptible to interence, quality loss, and poor quality over longer distances. Fourteen guage is a good thickness and suitable for most home theatres. Make sure its also not too thick - some speaker wire simply will not fit in to the speaker wire jacks on some receivers.
Some receivers use proprietary speaker inputs. Sony is one example. Many Sony receivers have special connectors for speaker wire and will not accept a standard speaker wire. You'll need to use either the Sony-provided speaker wire, take the ends off of Sony speaker wire and put it on your own, or buy some of these special connectors from Sony directly to place on your speaker wire. My recommendation? Avoid any receivers with non-standard speaker wire posts/jacks/connectors. Look for bind posts or other jacks that allow you to slide in and clamp down on a typical speaker wire.
Once you've got your speaker wire sorted out, you'll have to do some cutting and stripping if you opted to purchase your own. This is way easier than it sounds, so don't worry!
Measure out each length one at a time, cutting the speaker wire with either really great scissors or a sharp blade. Now you need to strip the ends of the wire. Use either a stripping tool or plain old scissors. You can place the scissors on the cable and gently apply some pressure as you twist the scissors around the cable, carefully slicing into the plastic coating. Eventually, it'll get weak enough that you can just slide it off by tugging on it with your fingers. You need at least 1/4" of exposed wire.
Now you can connect your speakers. Note on your speaker wire the difference between the two ends. You'll need to use one as your positive and one as your negative. Sometimes the coating is a different color between the two or there is text on one and not on the other. Keep track of this - whichever side you use for positive on your speaker, use it for positive on your receiver. Crossing the two can cause damage, either immediately or sometime in the future. It might work this way but you don't want it to!
Connecting the speakers is easy enough. Front left to front left on your receiver, center speaker to center on your receiver, etc... Your rear speakers may be referred to as "Surround" or "Rear Surround" instead of just "Rear", but keep in mind, if you have a 7.1 or 8.1 channel receiver, "Surround" may indicate side surround speakers, not rear speakers.
Subwoofers
Your subwoofer is going to be a little more complicated. There are a few different ways to do it and many variations of inputs/ouputs on the back side of subwoofers. I'm going to go with the most standard and efficient method first.
You will need a subwoofer cable for connecting your sub. If you don't have one or don't want to buy one, you can substitute it for a standard red or white RCA cable (or a pair, since they are usually connected; just let the other cable dangle). It will work, but its really not the best way to do it. You'll also need whats called a Y adapter. On the back of your sub, there should be a left/right input (red and white). You plug the Y adapter in to these connections and then your subwoofer cable (or RCA cable) in the other end of the Y (note: if you don't have a Y adapter, just choose the left or right input to plug into).
Now, take the other end of your cable and plug it into your receiver's
subwoofer preout. Hopefully you have a powered sub, meaning it gets plugged into an AC power outlet. All you need to do now is plug that in and your subwoofer is good to.
If you don't have RCA jacks on your subwoofer, or it only has speaker wire jacks (and its most likely not powered), you'll need to connect it the old fashioned way. Your front left and right speakers will plug into your subwoofer's ouput jacks instead of your receiver. You'll then run speaker wire from the left and right inputs on the subwoofer to your left and right speaker outputs on your receiver. This way, the subwoofer is powered by the receiver and will not work as well as a powered sub. You also take some power away from your front speakers with this method. A good idea is to buy a new, powered subwoofer with line in RCA jacks.
Connecting the Dots
You've got the hard stuff out of the way. Now finish it up by connecting your TV, DVD, and cable/satellite box. Always try using the best options first. If your DVD
has HDMI and so does your receiver, use it. If your DVD only has composite, s-video, and component, use component video cable. When it comes to audio, you absolutely need
to use digital coaxial (jacks are usually orange) or fiber optic (usually the jack is recessed into the unit and has a door on it; when the door is open, a red light is visible). If you do not use either of these two, you won't get true surround sound! When all else fails, resort to composite (red and white) audio connectors.
Note: Look closely at the connections on your receiver. Everything is labeled, like the first set of red, green, and blue component video inputs might be labeled "Comp 1". If you're using composite audio cablesfor your sound, you'll need to plug them into the jacks that coordinate with "Comp 1". This might not be clear by looking at the receiver, so refer to your receiver's manual to figure out which video inputs use which audio inputs. Most often, you'll be able to configure them from the receiver's internal menu using the remote control.
On some receivers, all the component video inputs, for example, are linked to a single composite audio input (usually "DVD"), so if you connect more than one of the component inputs, you will be competing for sound when more than one device is active. This is why you'd want to configure the component inputs to use different audio inputs.
Your manual is the only way to figure out how to go about it. Composite video will usually match up to composite audio inputs with naming conventions like Video 1 -> Video 1, Video 2 -> Video 2, etc., but cables like component and DVI may not. You should also configure digital audio inputs to match up with the video inputs you're planning on using. For example, if you're using a digital coaxial input (possibly "Digital 1"), and you use component video, you'll want to match "Digital 1" with "Comp 1". Again, refer to your users manual for how to do this.
See Also - VSX-03TXH Onkyo TX-SR304 AV Receiver